Click to scroll to a section in Cargo Site
Have you ever clicked on a link and scrolled to a different section present on that page? It is known as the smooth scroll effect. It can be applied to a link or icon as per your requirements.
This means instead of teleporting from one location to another on a page, you will scroll up or down depending on where you are. One advantage of this is that users will be able to look at the other content on the page.
Sadly, this isn’t possible with the default settings in cargo, and we can’t use plugins like WordPress. But like most things in web development, we can achieve it using HTML and CSS.
Today, I will demonstrate this process step-by-step to add a click to scroll to a section in Cargo Site.
What is the importance of click to scroll to a section in the Cargo Site?
- Seamless Navigation: Users enjoy a smoother transition between sections, enhancing their browsing experience.
- Increased Engagement: By guiding users through the page effortlessly, smooth scrolling encourages them to explore more content.
- Modern Appeal: Your website gains a contemporary and professional look, leaving a lasting impression on visitors.
- Improved Readability: Distraction-free scrolling allows users to focus on content, enhancing readability and comprehension.
Click to scroll in Cargo Site – Cargo 3
First, we are going to see how to implement click to scroll to a section in the Cargo 3. Follow these steps below:
Step 1: Creating Set and Pages
Open your Cargo 3 editor.
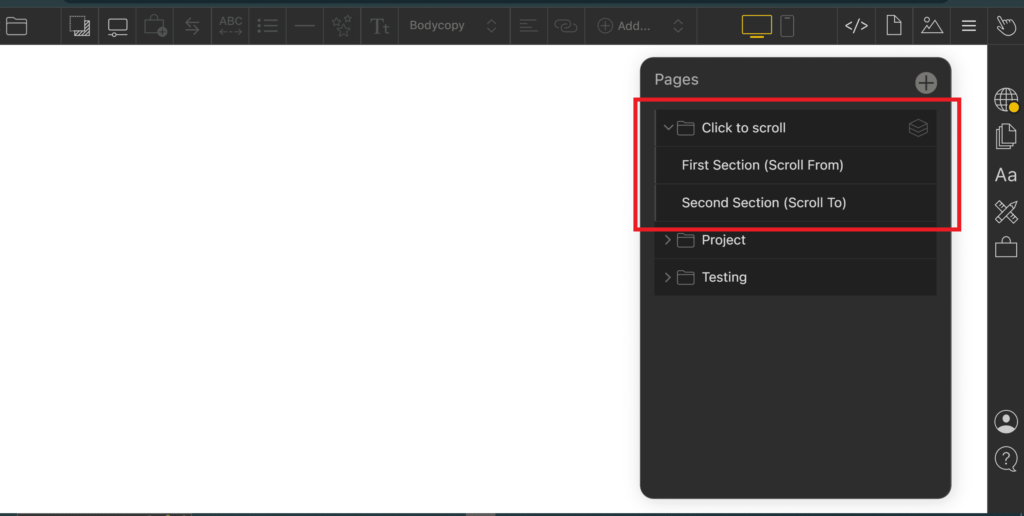
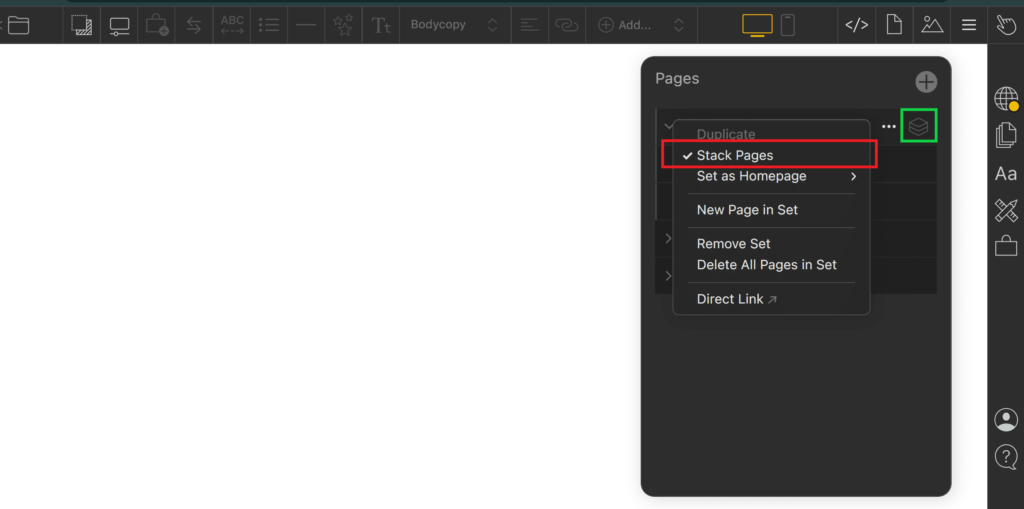
Then, create a new set and add two pages inside it. Make sure you stack the pages so that the first page acts as the first section, and the second page acts as the second section. In the first section, add a text anchor link or arrow icon like in our example. When clicked, it will smoothly move to the second section.
Step 2: Adding the anchor link in HTML
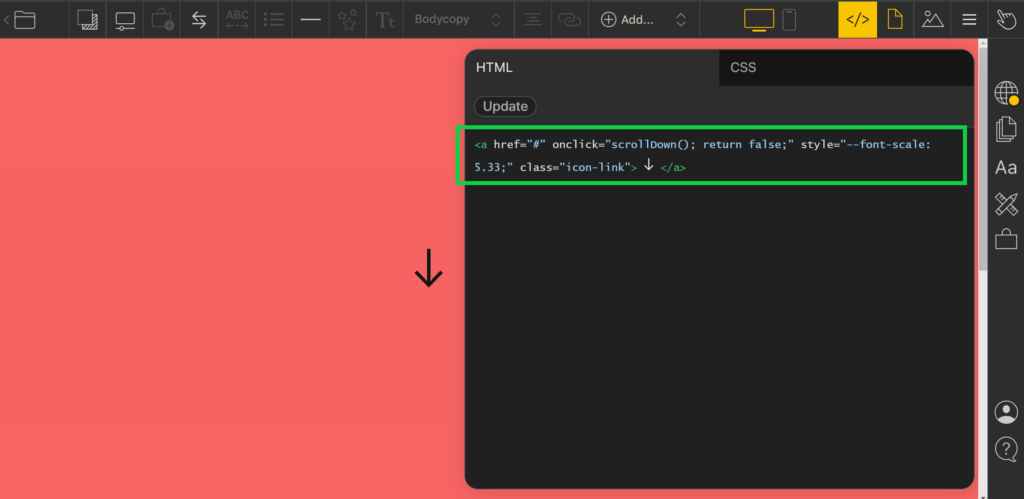
Click on the code icon to access the HTML section of your local page code editor. Then, wrap your text or icon with a tag, similar to the example code below:
<a class="icon-link" href="#" onclick="scrollDown(); return false;"><text-icon icon="downwards-arrow"></text-icon></a>Code Explanation :
<a>: This is an anchor element, denoted by the<a>tag. It is used to create hyperlinks in HTML.class="icon-link": This attribute assigns the class “icon-link” to the anchor element.href="#": Thehrefattribute specifies the URL of the link. In this case, “#” is used as a placeholder URL, indicating that clicking the link will not navigate to a different page but will instead trigger a JavaScript function.onclick="scrollDown(); return false;": This attribute specifies a JavaScript function to be executed when the link is clicked. In this case, it calls thescrollDown()function and then returns false to prevent the default behavior of following the link.- <text-icon icon=”downwards-arrow”></text-icon> – This is the code for the downward arrow in Cargo Site.
Step 3: Retrieving the Page ID for Scrolling
Next, go to the second page where clicking on the icon or text will trigger the scroll-down effect.
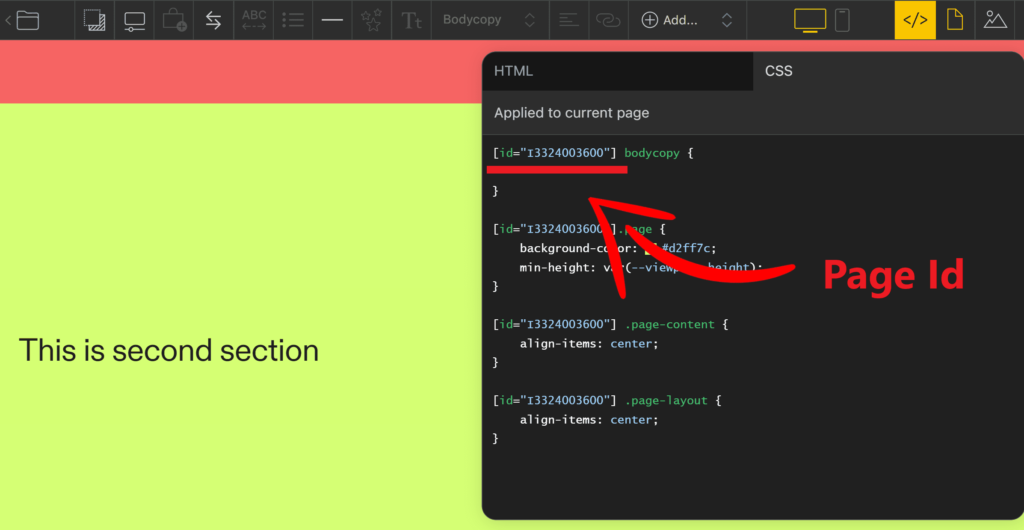
To get the page ID of the second page, click on the code icon to access the local page Code editor. Switch to the CSS section where you’ll find the ID mentioned. Copy that ID because we need to specify it in our JavaScript code.
Ensure you copy the correct ID of the page you want to scroll to; otherwise, this functionality will not work.
Step 4: Adding JavaScript for Scroll Effect on Click
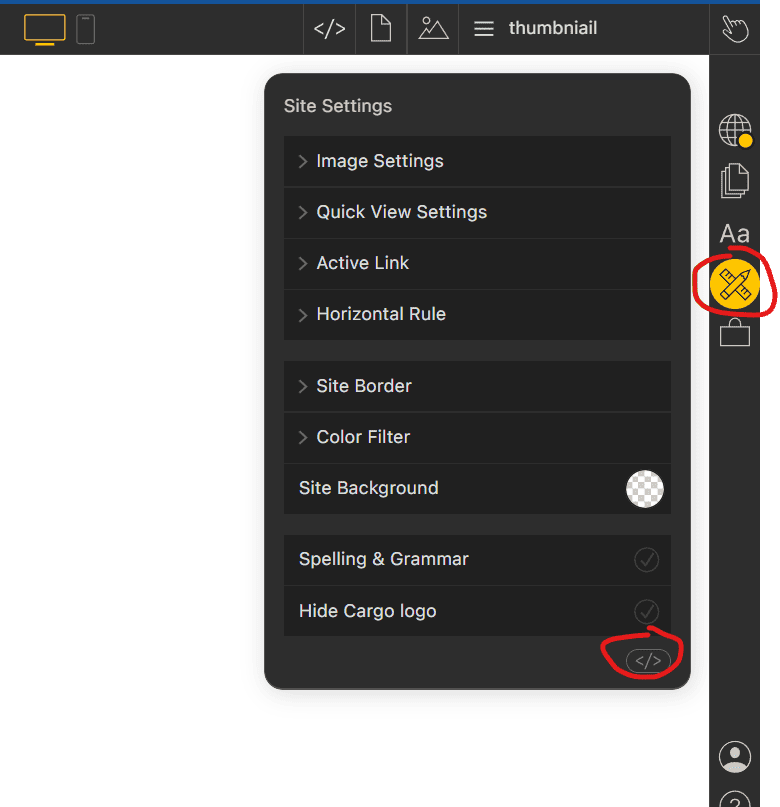
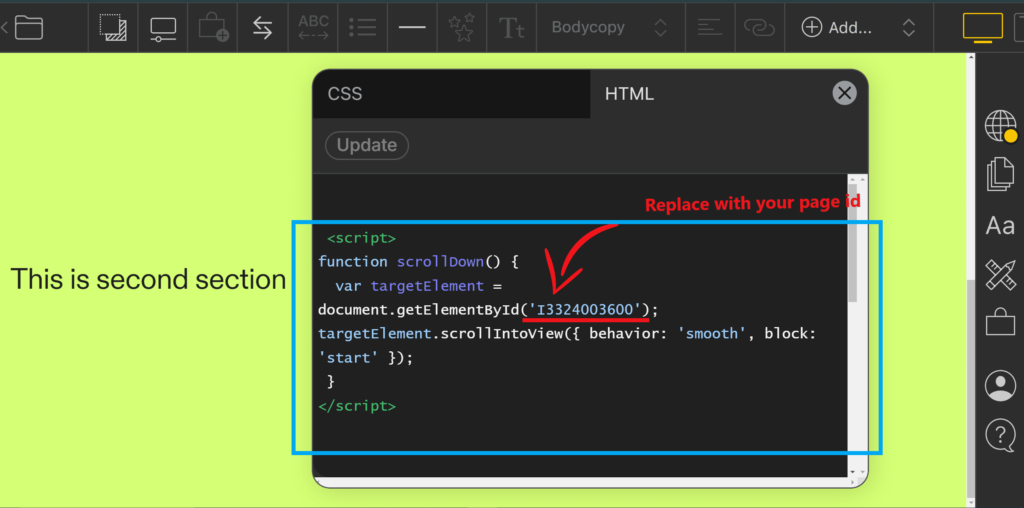
Now go to the global Code editor and in the HTML tag add the JS code.
<script>
function scrollDown() {
var targetElement = document.getElementById('I3324003600');
targetElement.scrollIntoView({ behavior: 'smooth', block: 'start' });
}
</script>
Code explanation –
function scrollDown() { ... }: This defines a JavaScript function namedscrollDown. This function will be executed when the associated link is clicked.var targetElement = document.getElementById('I3324003600');: This line retrieves the element with theidattribute set to ‘I3324003600’ from the document. The element with this ID is the target element that we want to scroll to. Make sure to replace this ID with your page ID.targetElement.scrollIntoView({ behavior: 'smooth', block: 'start' });: This line scrolls thetargetElementinto view. The{ behavior: 'smooth', block: 'start' }option specifies that the scrolling should be smooth, and the target element should be aligned to the top of the viewport.
Click to scroll in Cargo Site – Cargo 2
Let’s see how to implement this functionality in Cargo 2.
Step 1: Creating Set and Pages
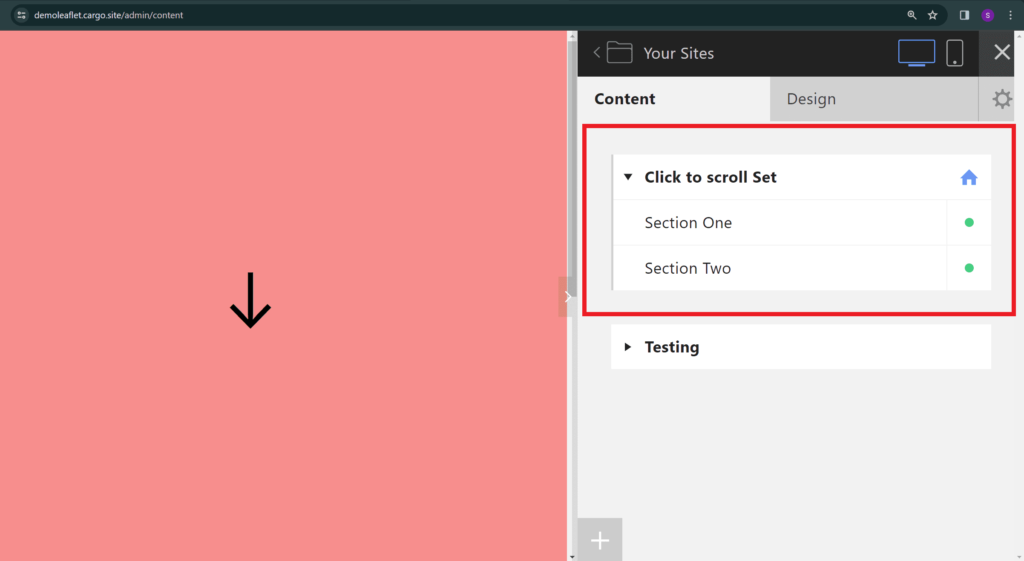
Create a set and add two pages called Section One and Section Two. Ensure they are stacked and turn the green dot on so that both are visible.
Step 2: Adding the anchor link in HTML
<a class="icon-link" href="#" onclick="scrollDown(); return false;" >Click to scroll</a>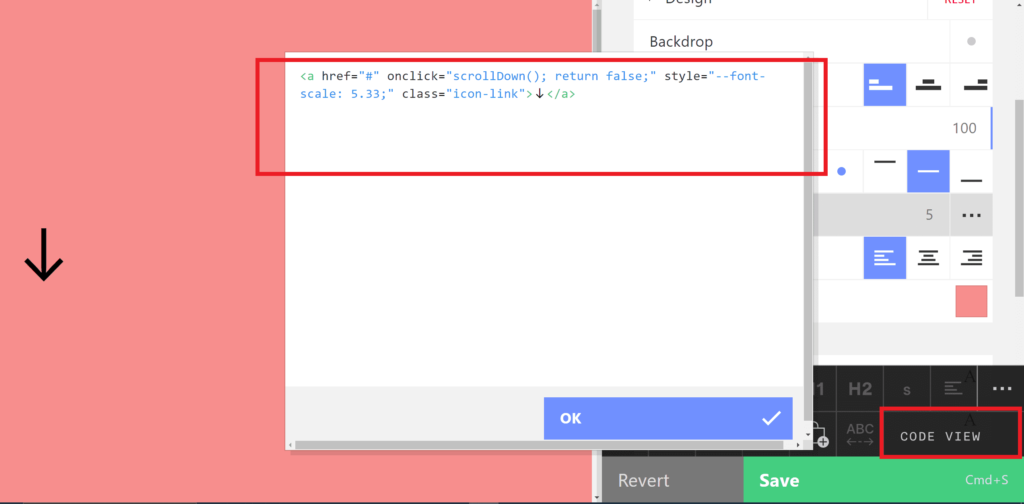
Step 3: Retrieving the Page ID for Scrolling
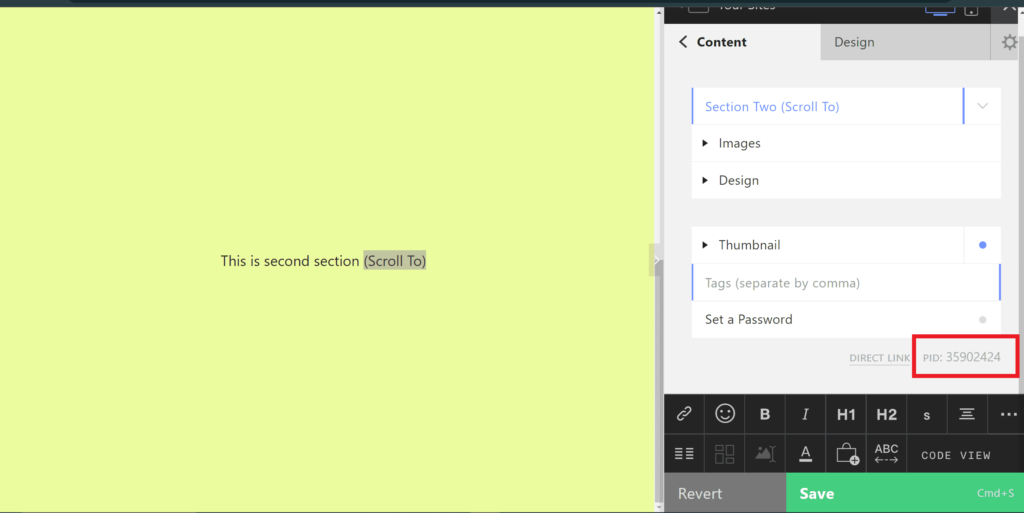
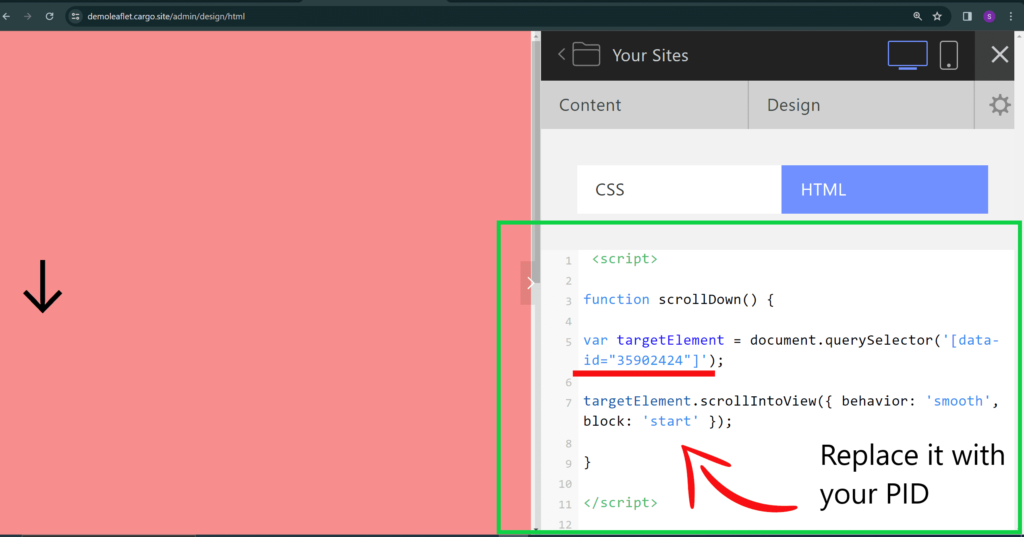
Next, navigate to Section Two where clicking on the anchor link will trigger scrolling. Locate the PID (Page ID) on that page and copy it. We’ll use this Page ID in our JavaScript code.
Step 4: Adding JavaScript for Scroll Effect on Click
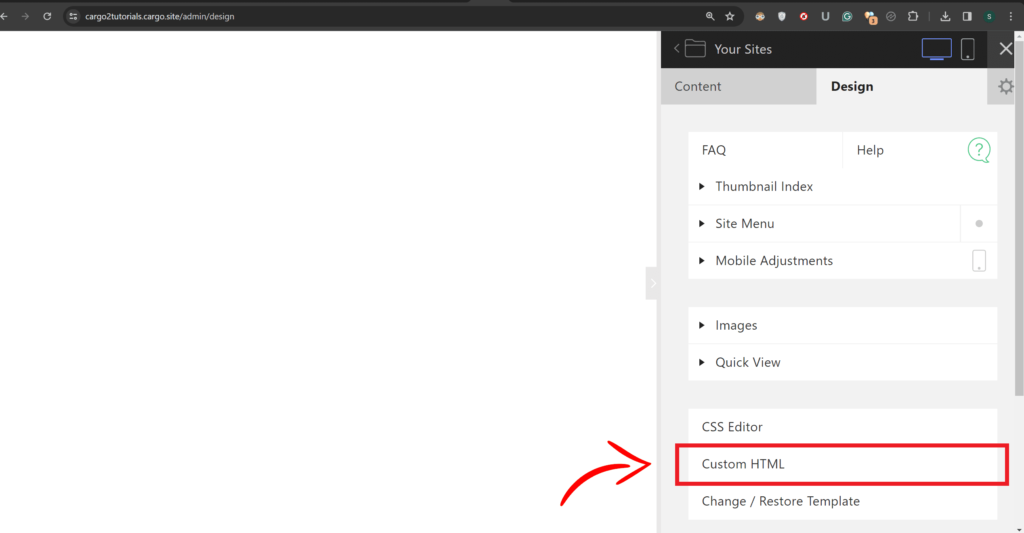
Head to the Design tab and select the Custom HTML tab. Then, paste and add the following JavaScript code:
 <script>

function scrollDown() {

var targetElement = document.querySelector('[data-id="35902424"]');

targetElement.scrollIntoView({ behavior: 'smooth', block: 'start' });

}

</script>
Please note: Remember to replace “PID” with your actual Page ID in the JavaScript code.
Add scroll to multiple elements present in the Cargo Site
Imagine you have a webpage with different things on it, like text and pictures. Now, say you want to make it so that when you click on a certain piece of text, the webpage automatically moves down to show a specific picture. To do this, follow the example below:
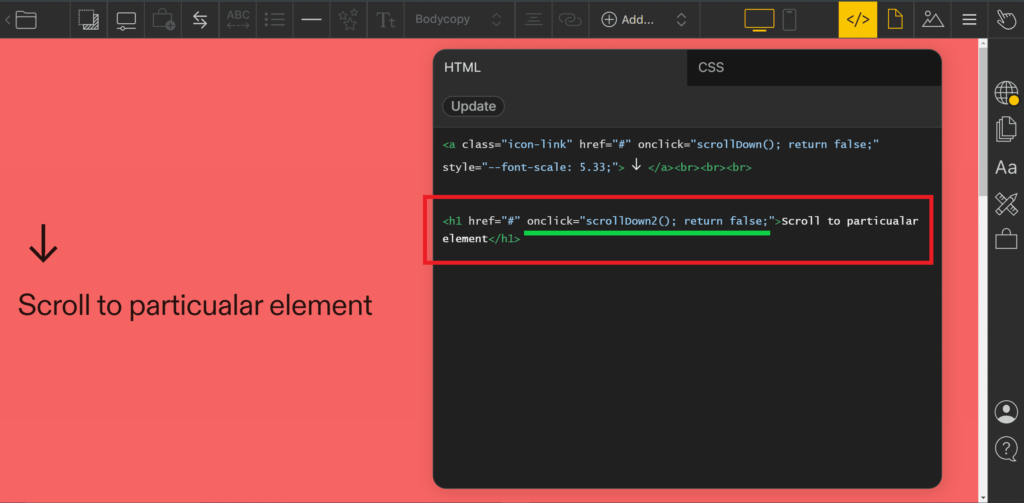
STEP 1: Add a new element with different function name
Add a text, set its href attribute to #, create an onclick function with a unique name like scrollDown2, and include return false to prevent the default behavior, ensuring it scrolls to the image as demonstrated below.
<a href="#" onclick="scrollDown2(); return false;">Click here to scroll to the image</a>
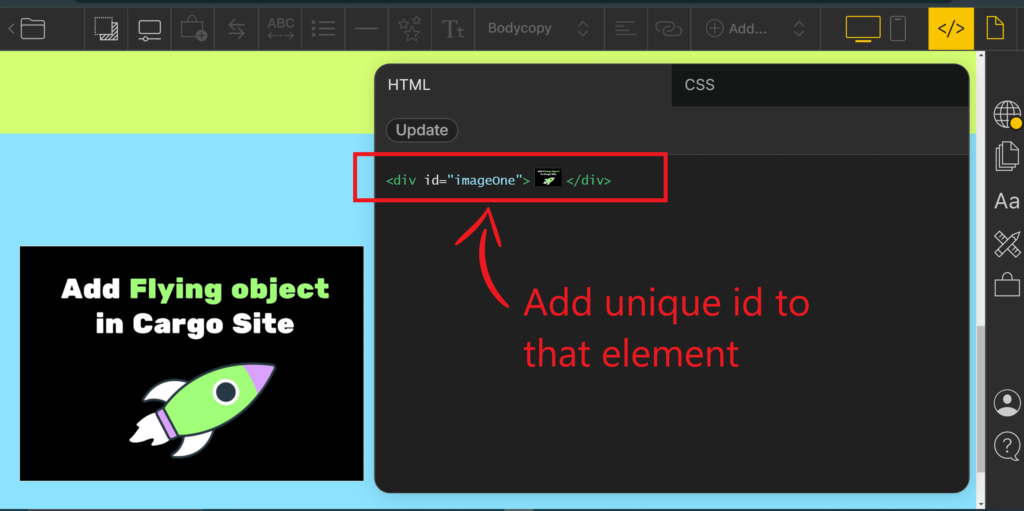
STEP 2: Add a unique ID to the image
Now, include an image on your webpage. Wrap this image with a <div> tag and assign a unique ID to it. This ID can be anything, but it must be unique so that when clicked, the page knows which element to scroll to. For instance, in our example, we used the ID “imageOne”.
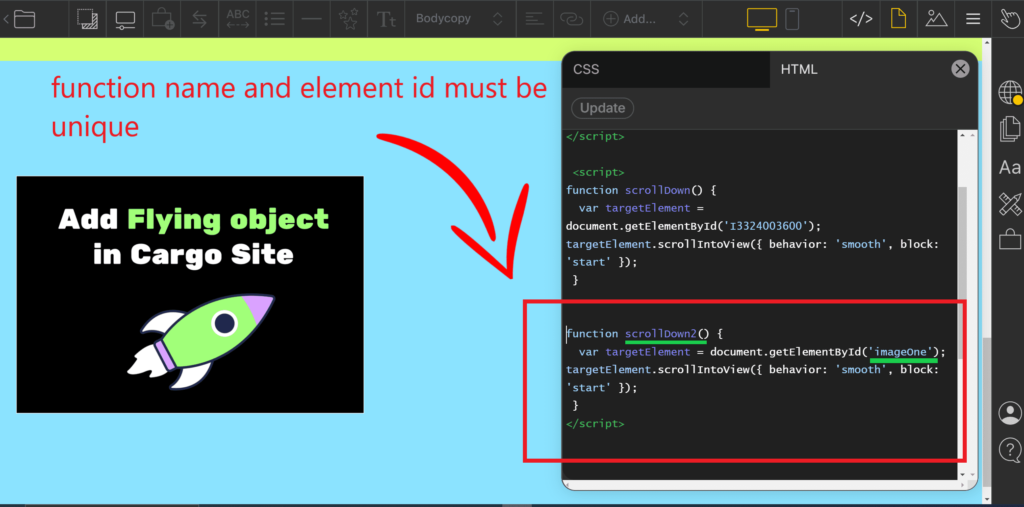
STEP 3: Add the JS code
Head to the global code editor and craft a new function with the name used previously, which is scrollDown2. Within this function, target the image element with the unique ID we assigned earlier, namely imageOne.
function scrollDown2() {
  var targetElement = document.getElementById('imageOne');
targetElement.scrollIntoView({ behavior: 'smooth', block: 'start' });
 }
Conclusion
Achieving smooth scrolling functionality in your Cargo site is straightforward using HTML and CSS. You can easily customize the provided code to suit your specific requirements.
If you run into any issues, feel free to drop your query in the forum.
I hope you have enjoyed reading this blog.🚀

